Showing posts with label java. Show all posts

Thursday, January 28, 2016

Microservices Framework for Java By WSO2

Microservices Framework for Java implemented by WSO2 currently available for developer preview and very soon WSO2 will release the WSO2 Microservices Framework 1.0.0. Based on facts WSO2 Microservices Framework is lightweight high performance runtime implemented on Java for java developers who are looking for compressive framework.


WSO2 Microservice Framework code base is free and open source that available in WSO2 Github repository 

Monday, November 2, 2015

Managing multiple Java versions in Mac

As java developer you may have to deal with more than on version of the JDKs. Therefore you might have to switch with JDK 1.8 to 1.7 and vice versa!!

Jenv allow you to manage your java version very easily.


1) Install Home brew
2) Install Jenv
3) Configure your Jenv
4) Put relavent alias to invoke Jenv!

You are done!!!!


In .bash_profile file my alias to invoke the jenv


PS- i really do not want to rewrite what Jenv does. Please read on Jenv :)

Thursday, September 24, 2015

Debug Web application in tomcat with Intellij Idea

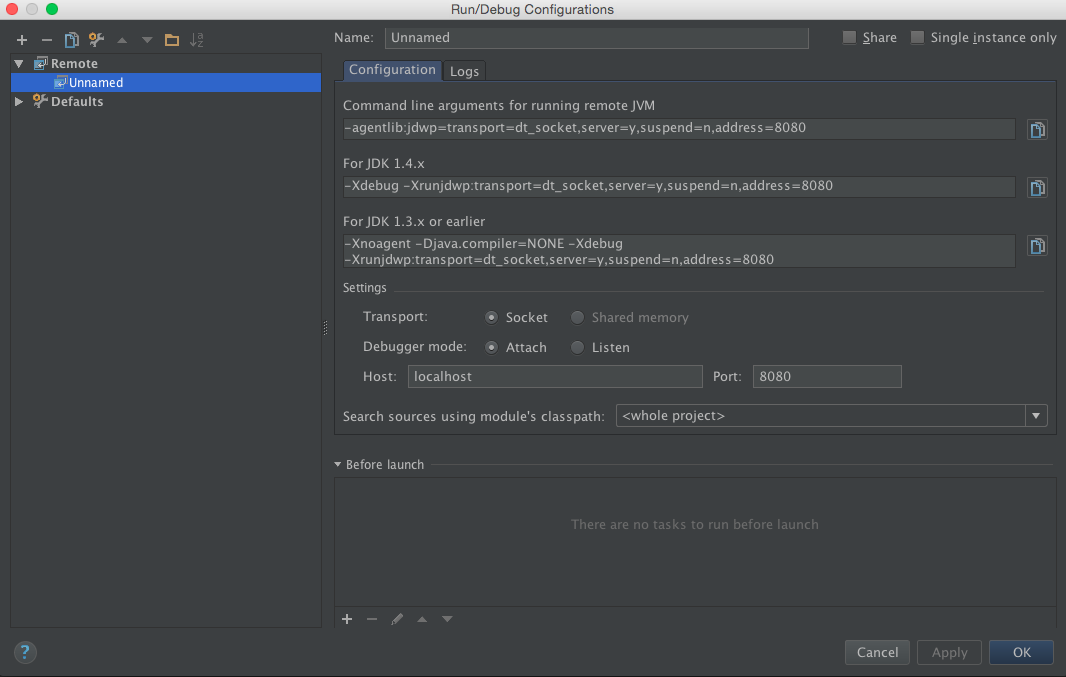
Tomcat facilitate the debugging capability with JPDA to web app developers and it explained in the official wiki of tomcat. However, document is not giving any explicit document for debugging with  Intellij Idea. Therefore in this blog, Step by Step guide is given to debug the web app hosted in tomcat with Intellij Idea.


Step 1
Export the JPDA port 
LM-SFA-00871979:apache-tomcat-7.0.64 vsivajothy$ export JPDA_ADDRESS="8080"

Step 2
Start the Tomcat server with JPDA

LM-SFA-00871979:apache-tomcat-7.0.64 vsivajothy$ bin/catalina.sh jpda start


Step 3

Create a remort debugging with Intellij Idea with port that given for JPDA.


Step 4
Run the project with 


Thursday, September 17, 2015

Interesting Pattern with single for loop!

Minimum loop required to print below Pattern (can be n*n).

4 4 4 4 4 4 4 
4 3 3 3 3 3 4 
4 3 2 2 2 3 4 
4 3 2 1 2 3 4 
4 3 2 2 2 3 4 
4 3 3 3 3 3 4 
4 4 4 4 4 4 4 

Tuesday, July 22, 2014

Check the available Cipher providers and Cipher algorithms in Java Virtual Machine(JVM)

During the penetration test normally the ethical hacker will also evaluate all the aspects of the Java Virtual Machine(JVM). As a part of it they use to check the weak available ciphers out there in JVM.


Therefore, I have create a simple java code to list of all the available ciphers and their providers in the given Java virtual machine. Please find the code below in my Gist


Thursday, January 30, 2014

Unable to create new native thread and max user processes

very often i have seen "Unable to create new native" error when i am writing Multi threaded programming in Java on Linux box


The error stack usually shout like below!
ava.lang.OutOfMemoryError: unable to create new native thread 
        at java.lang.Thread.start0(Native Method) 
        at java.lang.Thread.start(Thread.java:691) 

One of the reason for this is number of Max User Processes for given user in your Linux box is very low!
you can check the number of Max User Processes by typing the command ulimit -a


[vanji@myMachine area51]$ ulimit -a

core file size (blocks, -c) 0
data seg size (kbytes, -d) unlimited
scheduling priority (-e) 0
file size (blocks, -f) unlimited
pending signals (-i) 95153
max locked memory (kbytes, -l) unlimited
max memory size (kbytes, -m) unlimited
open files (-n) 32768
pipe size (512 bytes, -p) 8
POSIX message queues (bytes, -q) 819200
real-time priority (-r) 0
stack size (kbytes, -s) 10240
cpu time (seconds, -t) unlimited
max user processes (-u) 1024 
virtual memory (kbytes, -v) unlimited
file locks (-x) unlimited

So how do we increase the max user processes ?


Follow the step:

vi /etc/security/limits.conf  and add below the menstioed

*          soft     nproc          65535
*          hard     nproc          65535
*          soft     nofile         65535
*          hard     nofile         65535

Save and Exit check the user max processes ulimit


[vanji@myMachine area51]$ ulimit -a

core file size (blocks, -c) 0
data seg size (kbytes, -d) unlimited
scheduling priority (-e) 0
file size (blocks, -f) unlimited
pending signals (-i) 95153
max locked memory (kbytes, -l) unlimited
max memory size (kbytes, -m) unlimited
open files (-n) 32768
pipe size (512 bytes, -p) 8
POSIX message queues (bytes, -q) 819200
real-time priority (-r) 0
stack size (kbytes, -s) 10240
cpu time (seconds, -t) unlimited
max user processes (-u) 65535 
virtual memory (kbytes, -v) unlimited
file locks (-x) unlimited


Saturday, November 2, 2013

Upload a file Using JSP

This demonstration will guide you, how to upload a file into folder (you can define the path) using JSP.

Pre-Request

Application server - I am using Wso2 Application Server. Since it is very user friendly to configure and mange my application using cool user interfaces.

Further Readings,
[1]http://wso2.org/library/articles/2012/10/getting-full-features-apache-tomcat-supported-wso2-application-server
[2] http://docs.wso2.org/wiki/display/AS510/Installation+Guide

Maven - As build tool i am using.

Further Readings,
[1] http://vanjikumaran.blogspot.com/2013/04/installing-maven-and-ant-in-ubuntu.html

let see the codes


Saturday, August 17, 2013

TCP- Close wait simulation - Part 3

Lets try to do some dirty way of coding to produce close_wait!

Check out my server code! I am opening up new socket and waiting for request from client!
Once request is received, writing out a message to client and closing the connection then and there!
Server Code


In Client code I am creating new connection with Server and puting the clinet into sleep mode with out closing the connection.
Client Code


This will results as bellow!


Tuesday, August 13, 2013

TCP- Close wait simulation - Part 2

In my last blog , I gave a brief idea about TCP and TCP states, Lets check how its work in real network by simulating the TCP connection using NS2 simulator.

So what is NS2?

NS2 is a discrete event network simulator. It is aimed at network research, and supports simulation of various facets of networking, including TCP, multicast, and routing protocols.

You can easly install NS2 in Ubunutu using "Ubunutu Software Center", as usual make use of your terminal and install. sudo apt-get install ns2 nam xgraph.

Below NS2 Script contain TCP - TCP compare.


Below NS2 Script contain TCP-UDP compare

you can run these codes using ns .tcl

Above NS2 scripts help you to simulate how TCP's functionality in the real network.
Lets see what has happened!

As shown in Figure 1, the network model was configured with two TCP (TransmissionControl Protocol) flows for two milliseconds and recorded observation in trace files.

Figure 1
Trace files were plotted using “xgraph” utility and it has been shown in figure 2
Figure 2
According to the results given by the experiment, TCP flows fairly shared the network bandwidth.

As shown in Figure 3, additional another experiment was conducted in respect to model the TCP flow and UDP (User Datagram Protocol) flow in shared network environment, which experiment was inspected for two milliseconds. Furthermore, observations were recorded in the trace file as previous experiment.
Figure 3 
Second experiment’s trace files were plotted using “xgraph” utility and it has been shown in Figure 4.

In accordance with the second experimental result given in the Figure 4, UPD flow was taken over the shared network resource from TCP flow and it did not moderately shared the band with it .

Figure 4

According to Figure 5, in first experiment; first TCP flow was shared the bandwidth with second TCP flow. In second experiment; TCP flow was trampled by UDP flow.Hence, as a conclusion of those two experiments, TCP Shares the network resource fairly.Nevertheless, UPD does not share the network resource.

Even though this is irrelevant to this topic, this help us to understand the behavior of the TCP connections.

Sunday, August 11, 2013

TCP - Close wait simulation - Part 1


In this blog series i will try to explain how to simulate CLOSE_WAIT state of TCP in java . In order to do that as a prerequisite you have to understand the TCP. Therefore i refer to refer to "Computer Network" by Anrew Tanenbaum [1] in this first part of this series. In my next blog post i will simulated the behavior of the TCP using NS2 network simulation tool.Thereafter, I will be show simple code snippet  to demonstrate the CLOSE_WAIT.

So lets start with TCP.......

TCP

Transmission Control Protocol (TCP) is designed to be a bidirectional, ordered, and reliable data transmission protocol between two end points (programs). In this context, the term reliable means that it will retransmit the packets if it gets lost in the middle. TCP guarantees the reliability by sending back Acknowledgment (ACK) packets back for a single or a range of packets received from the peer.

This goes same for the control signals such as termination request/response. RFC 793 defines the TIME-WAIT state to be as follows:

TIME-WAIT - represents waiting for enough time to pass to be sure the remote TCP received the acknowledgment of its connection termination request.

See the following TCP state diagram: 

alt text

TCP is a bidirectional communication protocol, so when the connection is established, there is not a difference between the client and the server. Also, either one can call quits, and both peers needs to agree on closing to fully close an established TCP connection.

Let's call the first one to call the quits as the active closer, and the other peer the passive closer. When the active closer sends FIN, the state goes to FIN-WAIT-1. Then it receives an ACK for the sent FIN and the state goes to FIN-WAIT-2. Once it receives FIN also from the passive closer, the active closer sends the ACK to the FIN and the state goes to TIME-WAIT. In case the passive closer did not received the ACK to the second FIN, it will retransmit the FIN packet.

RFC 793 sets the TIME-OUT to be twice the Maximum Segment Lifetime, or 2MSL. Since MSL, the maximum time a packet can wander around Internet, is set to 2 minutes, 2MSL is 4 minutes. Since there is no ACK to an ACK, the active closer can't do anything but to wait 4 minutes if it adheres to the TCP/IP protocol correctly, just in case the passive sender has not received the ACK to its FIN (theoretically).

References


[1]Tanenbaum, A. 1996. Computer networks. Upper Saddle River, N.J.: Prentice Hall PTR.


Monday, July 29, 2013

Hello JAX-RS


In my last post i have given a brief  introduction to JAX-RS. Before look into this further It would be great if we do a hands on session to understand the usage and development procedure.


For the change, I will start with “Hello JAX-RS” instant of “Hello World”!!!!


In order to do this i am using maven as a builder, Tomcat Server as application server and Idea intellij as IDE. Most importantly I am using jersey 1.17.1 as the JAX-RS implementation.


First of all we have to create a web application project. This task can be achieved by maven.


mvn archetype:generate -DgroupId=com.area51.rest -DartifactId=RESTfulExample -DarchetypeArtifactId=maven-archetype-webapp -DinteractiveMode=false


After project created by maven, the folder structure looks like. If you see carefully "java" folder is not there in the folder structure.

Folder Structure
Thu i have manually added a folder under src/main/java and ran mvn idea:idea (if you are using eclipse use mvn idea:idea)


I have share the complete project here 


Given pom.xml I have added the  dependency for  jersy and set the source as java 1.6.
HelloJaxRsService.java is the implementation for "Hello JAX - RS"demonstration.

If you carefully study into the code that i have given, you can understand that "@Path("/hello")" annotation indicate the context of the class "HelloJaxRsService.java". "@GET" indicate the methods classify the methods as GET request method (HTTP vocabulary of request operation).  @Path("world/{param}") annotation is a resource in the "hello" context with the parameter.


Okay, Lets up and run this code.

First of all! compile the code using maven!,  get the "war" file! and configure the apache tomacat server with it.

In this example, web request from “projectURL/rest/hello/” will match to “HelloJaxRsService“, via @Path("/hello").

http://localhost:9000/RESTfulExample/rest/hello/world/human request hits the hello context and world resource.


http://localhost:9000/RESTfulExample/rest/hello/home/Vanjikumaran request hits the hello context and home resource.


Thursday, July 11, 2013

Java API for RESTful Services

Java API for RESTful Services (JAX-RS)

JAX-RS: Java API for RESTful Web Services is a Java API that provides support in creating web services according to the Representational State Transfer (REST) architectural pattern. Furthermore JAX-RS uses annotations to simplify the development and deployment of web service clients and endpoints.

To Understand further about JAX-RS refer the document provided by oracle[1] which contain compressible information about JAX-RS.


You can find various implementation that are available in industry and well known implementation are

1) Apache CXF - an open source Web service framework provided by Apache Software Foundation.
2) Jersey - an implementation from Oracle.
3) ESTeasy - an implementation from JBoss.
4) Apache Wink, Apache Software Foundation Incubator project, the server module implements JAX-RS.


I will provide a sample implementation for REST Web Service using JAX-RS in near future blog.
Until that please keep on reading :)


[1] http://docs.oracle.com/javaee/6/tutorial/doc/giepu.html
[2] http://en.wikipedia.org/wiki/Java_API_for_RESTful_Web_Services


Friday, June 3, 2011

First Experiment with Android Development Tools


In order to continue this tutorial, you should have installed necessary development tools and IDE for Android application development. If not please go through with my previous blog!

Open the Eclipes IDE and click on File -> New->Other
Then you will find a wizard as give in Figure 1, and select Android Project.

Figure 1
Figure 2

Once you typed the project name you may encounter an error saying that “An SDK Target must be specified.” It means that you have not set the respective android SDK for the tool.

In order to set the path, go to window -> preference. You will find a wizard as shown in figure 3,

Figure 3

Select android first and give the SDK location by selecting “Browse...” button. Once you select the correct path press “Apply” button. The “Figure 4” is illustrating the result of previous query.

Figure 4

Wheew…. We are configured the development tool!
Now we will start to create our first android application!!... Better we call it as Testing application ;)
As mention previously create a new android project and give the values for respective fields and click on finish.
Figure 5

Now go to package explorer and Right click on the Sample project.

Figure 6

Go to Run As -> and clicks on Android Application!! WOW are we done with our application work mmmm is that possible to see our applications output???!
Answer is No…. you will get an error! As mentioned in figure 7!!!!

Figure 7
Well it is ok! ;) Since we haven’t configured our “android virtual device” emulator for test our system we got this error.
In order to tackle this, click on “Yes” Button.
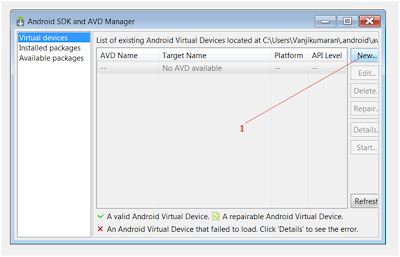
Then you will get AVD Manger, where you should click “New” button in order to configure new AVD!

Figure 8
Figure 9
Click "start" on AVD Manager!

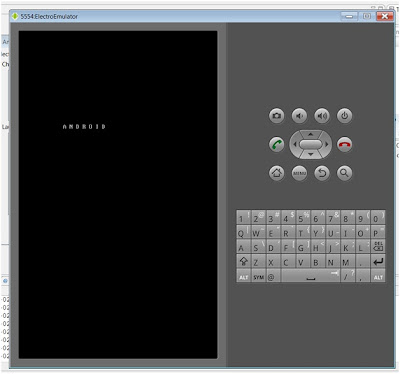
WOW you got the new anroid Emulator

Figure 10

Wait for some time until it load.... it may take 1 to 5 minutes depend on machine performance.
Figure 11


Before you get into programming… have some nice time with the AVD and experiment it!

Figure 12


Wohhwww whooww it’s awesome! It is your program in mobile!! Well done.
If you have any problem in this experiment and configuration let me know I’ll try to help you out!