Thursday, May 9, 2013

எண்முறை சான்றிதழ்களையும் எண்முறை இரகசிய கடவுச்சொற்களையும் எவ்வாறு மேலாண்மை செய்வது- ஒரு மேலோட்டம்

நான் தமிழில் பதிவிட்டு கணக்கா நாள் ஆகிவிட்டது!!! கடைசியாக CA பற்றி அலம்பி இருந்தனான். புது வேலைக்கு போனாப்பிறகும்.... கல்யாணம் கட்டினாப்பிறகும்.... நேரம் கிடைக்கிறது குறைவுதான்!!

சரி.. இந்த முறை கடைசியா பதிவிட்டதினை கொஞ்சம் ஆழமா தோண்டி பார்க்கலாம்!!!


முன் அனுபவம்- உங்களுக்கு MSc Computer Science இருந்தா நல்லம்!!! இல்லாடி பரவாயில்லை!!! அனால் எதையாவது தேடி படிக்கோணும் எண்டு இருக்கிறிங்கள் எண்டா நீங்கள் ஒரு PhD தான்.


வர போகிற வாரங்களில் முன்று கட்டங்களாக, எண்முறை சான்றிதழ்களையும் எண்முறை இரகசிய கடவுச்சொற்களையும் எவ்வாறு மேலாண்மை செய்வது என்று பார்க்கலாம்!!

 இதை ஆங்கிலத்தில் "Keystore Management" என்று சொல்லுவார்கள்!!!!


இந்த இரு படங்களும் netல சுட்டடது!!!! ஆனா இதை "Keystore Management" தொடர்பு படுத்தியது என்னுடைய கற்பனை... உங்களுக்கும் கொஞ்சம் கற்பனை சக்தி இருந்தா!!! உங்கட கற்பனை குதிரையை தட்டி விடுங்க...


அடுத்த பதிவில சந்திக்கும் வரைக்கும் உங்களில் இருந்து விடைபெறுவது ........
உங்கட ஆல் அடியான்


Thursday, April 4, 2013

Cool Terminal Commands to identify your OS detail

I want get the details about my current Ubunutu OS that has been installed in my machine!
as a result of google search. I found few cool commands!


1) uname -a

This command will retrieve you, full detail of the OS that install in your computer.

Linux vanjikumaran-ThinkPad-T530 3.5.0-17-generic #28-Ubuntu SMP Tue Oct 9 19:31:23 UTC 2012 x86_64 x86_64 x86_64 GNU/Linux


2) lsb_release -d


This command should give you the the description including the OS name ("Ubuntu" on an Ubuntu system) and the release number.

Description:    Ubuntu 12.10
 

3) lsb_release -c

This will give you just the codename.

Codename:    quantal

 
4) lsb_release -r

This will give you just the release number only.

Release:    12.10


5) lsb_release -a

This will provide you full lsb detail.

No LSB modules are available.
Distributor ID:    Ubuntu
Description:    Ubuntu 12.10
Release:    12.10
Codename:    quantal

Monday, April 1, 2013

Create a Web Application project using Maven


This post i will briefly guide you how to create a simple web Application using maven tool.

Since i am using intellij IDEA As IDE, by default the project that i am creating will be created in the "IdeaProjects" directory.

In order to demonstrate this task, i am creating a web app called SampleWebApp.

mvn archetype:create 
-DarchetypeGroupId=org.apache.maven.archetypes 
-DarchetypeArtifactId=maven-archetype-webapp 
-DarchetypeVersion=1.0 
-DgroupId=com.sample.test 
-DartifactId=SampleWebApp 
-Dversion=1.0-SNAPSHOT


As a result of running above given code snippets in the terminal or cmd, you will get bellow directory and file structure. This automated process is reducing the workload of the developer.


Now you can use your IDE to open up the projects and start coding.


for further reading about maven
[1]http://maven.apache.org/guides/introduction/introduction-to-archetypes.html
[2]http://www.sonatype.com/books/mvnref-book/reference/

Installing Maven and Ant in Ubuntu

Configuring Maven or Ant in the Ubuntu is relatively very easy task!

Just a matter of invoking above code code snippets in terminal!

to install Maven

sudo apt-get install maven

for further detail, visit to http://maven.apache.org/


to Install Ant

sudo apt-get install ant

for further detail, visit to http://ant.apache.org/


Sunday, March 31, 2013

Install VIM in Ubuntu with Features

This post will explain how to install VIM in Ubunutu with Features in step by step Process.

The Default VIM editor do not show any syntax highlighting.

Therefore, 

If you install this VIM configuration, in run time you can see the syntax highlighting in your code!

apt-get install vim vim-common vim-gnome vim-gui-common vim-runtime


Interesting Post be read regard VIM commands,
[1]http://bullium.com/support/vim.html
[2]https://help.ubuntu.com/community/VimHowto
[3]http://www.yolinux.com/TUTORIALS/LinuxTutorialAdvanced_vi.html

Happy Coding :D

Activate and use laptop Fingerprint Reader in ubuntu

This post will guide you step by step, how to Activate and use laptop Fingerprint Reader in Ubuntu.

Tested in Lenovo T530


for Further Information Please follow this link https://launchpad.net/~fingerprint/+archive/fprint


Step 1

Add this PPA to your sources:


  sudo add-apt-repository ppa:fingerprint/fprint
  sudo apt-get update
  sudo apt-get upgrade


Step 2

Install the Software:

 sudo apt-get install libfprint0 fprint-demo libpam-fprintd gksu-polkit


Important Note:

If you have experimented with fingerprint authentication before and have changed your /etc/pam.d/common-auth, you may be presented with a screen asking whether you want to override those changes. Select Yes. Under very special circumstances, you may get an error saying

   pam-auth-update: Local modifications to /etc/pam.d/common-*, not updating.
   pam-auth-update: Run pam-auth-update --force to override.

In this case, run “sudo pam-auth-update --force”, exactly as suggested, and enable the fprintd profile manually. Leave the standard system profiles (Unix, Keyring and ConsoleKit) enabled as well.


Step 3

Launch “fprint project demo” and check that you can enroll and verify your fingerprints and that your reader is indeed supported.


Step 4

Run “fprintd-enroll” in terminal to save your fingerprint.


system will request you to enroll the finger  print.


That's All :)

Now lock your screen and unlock by fingerprint reader :)


security Alert 


Image is taken from http://www.navigantresearch.com/research/smart-meter-security

if you consider more about your laptop's data protection, you should disable the guest account otherwise anyone can simply access your computer as a guest and they have read access to your home folder by default.

How to Disable Ubuntu’s Guest Session Account
** Edit following file
sudo vim /etc/lightdm/lightdm.conf

** Append following line under [SeatDefaults]
allow-guest=false

** Reboot the computer or restart your graphical environment by following command
sudo restart lightdm


Upgrade Ubuntu 12.04 to Ubuntu 12.10

This Post will explain, how to upgrade Ubuntu 12.04 to Ubuntu 12.10 in step by step Order.

Author assume that, user currently having 12.04 version in his/her machine.


Step 1

Open up Update manger, you can achieve it by typing "Update manger" in "Dash Home".

Step 2

In the Update Manger, user can find "Settings" Button, Click it.

Step 3

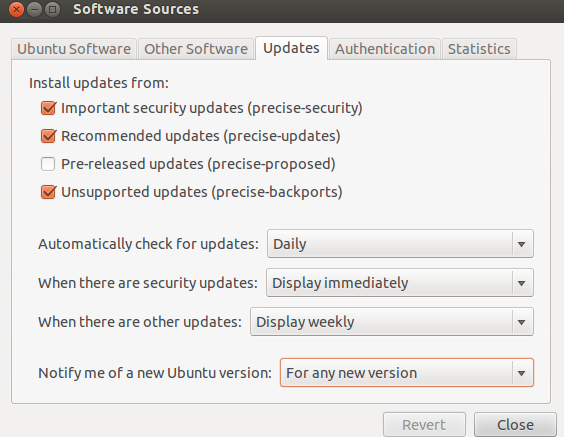
Select "Updates" Tab.


 Step 4

Select "For any new version" option form drop down available in "Notify me of a new Ubuntu version" and close the settings.


 Step 5

Now it is possible to see, New option in "Update Manger". 

Click "Upgrade" in order to upgrade your system to "Ubuntu 12.10"